How to Validate ✅ Your Product Idea 💡 Using 3 Tools

Making sure there’s demand for your product before starting to build it is crucial.
You don’t want to dump your energy and resources into a product that no one needs or is just nice to have.
That’s why it’s necessary to validate your product idea before starting to write a line of code.
But, it often gets overlooked because you think you already know what people want. Please…

Sometimes you’re so excited about launching your product that even if you think about validation, you rush through it.
Or you have no idea how to validate.
This lack of validation is a major reason why 9 out of 10 startups fail.
Whatever the case may be, I’m here to help with a possible way to validate your product idea with minimal amount of resources.
Before jumping into the process of setting things up, let’s have a look at the concept of the Minimum Viable Product.
Minimum Viable Product (MVP)

Most startups use the Lean Startup Methodology.
And one of its key elements is the build-measure-learn feedback loop.
The first step of the process is to figure out a problem that needs to be solved. Then building a minimum viable product so you can start learning as soon as possible.
Eric Ries, the author of Lean Startup coined the term and he described it as:
“A Minimum Viable Product is that version of a new product which allows a team to collect the maximum amount of validated learning about customers with the least effort.”
Later, the definition was simplified to:
“the smallest thing you can build that lets you quickly make it around the build/measure/learn loop”.

The simplification broadened the meaning of the term. Note how in the earlier definition Eric talks about MVP as a “version of a new product”. While in the simplified version it’s “the smallest thing you can build”.
How to Validate Your Product Idea — Step-by-step
But before you start to build anything you have to be sure that your idea solves the problem of your intended audience. And what better way is there to gauge interest than conducting your own research?
The steps:
- Set up the Landing Page
- Connect the Landing Page to your Email Marketing Software
- Build the product Validation Survey
- Create the Email with the Embedded Form
- Launch
- Analyze your Data
Set up the Landing Page — Unbounce
The first thing you’ll need is a landing page for your product. It has to look like it’s the page of an already established business.
You can use the landing page creator of your choice, but I recommend Unbounce. It has an easy to use drag & drop landing page builder with all the necessary features.
When setting up the landing page there are two main things you should pay attention to:
- get it up and running quickly,
The page should look professional, but don’t get lost in the design Bermuda triangle. Something clean and simple should do the trick. - and make sure it speaks to your audience.
You should write copy that resonates with them and describes the benefits of your product.
This landing page is also a great opportunity to start testing.
During validation tests, it’s important to use the A/B testing features of landing page builders. You’ll uncover valuable insights that can help you in building your MVP and marketing strategy.
Experimenting with your head- and tagline can get you more conversions. Also, a clearer picture of what resonates with your audience.
So you have a landing page (with at least 2 variations) up and running.
Connect the Landing Page to your Email Marketing Software
Now you have to connect your landing page to your email marketing software.
Now I’m going to show you how to connect Automizy and Unbounce.
- First, go to Contacts -> Signup Forms in Automizy.
- On the top, next to the “Detect Form” button you’ll see a plug icon. Click on it.
- A window pops up with 2 options. Select “Do it yourself”. You’ll see an URL, copy that.
- Login to Unbounce and open the landing page you built.
- Scroll down to “Basic Form Integrations” panel.
- Click “Webhook: POST or URL” button.
- Insert the URL to the popup window by hitting Ctrl+V (PC) or CMD+V (Mac).
- Go to the live landing page and subscribe. And you’re DONE!
Create your Welcome Email with an Embedded Survey
It’s time to create your welcome email with the embedded survey. It’s way better to have a question in the email that the recipients answer to with one click, then a link. And, you can embed an NPS style question in your email.
Build the Product Validation Survey — GetFeedback
For creating the embeddable survey we’re going to use GetFeedback.
Register for a free trial and once you’re in select the “Use a Template” option.
Then in the sidebar choose “Customer Feedback” and after that select the “Net Promoter Score” survey.
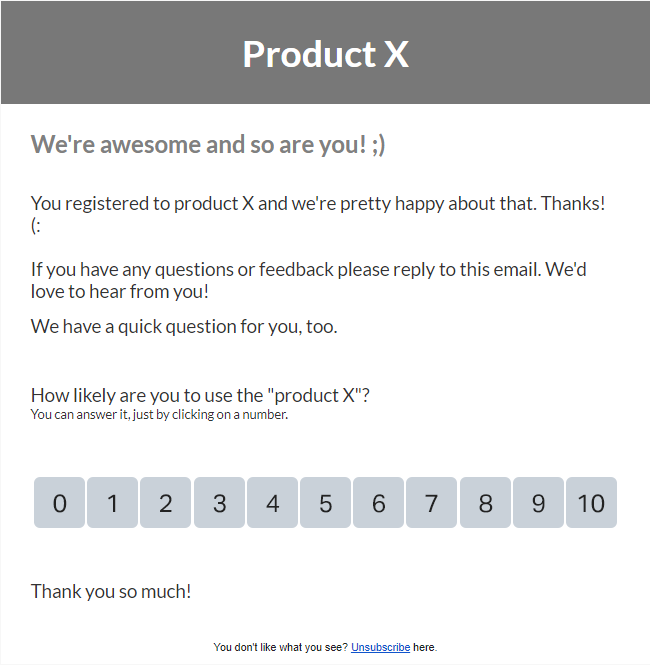
On the right above the preview you’ll see a “Use This Template” button, click on it. Then you can start editing the survey. For this example, I’m going to create a simple 1 question survey. In the welcome email, I’m going to ask the NPS style question: “How likely are you to use the “product X”?”. The recipients can choose a number from 0 to 10 based on the impression the sale page gave them.
Now that our simple survey is set up, it’s time to create the email and embed the question.
Create the Email — Automizy
Design an email with your logo, the headline and colors of the landing page you’ve created.
Under the header include a couple (2–3) sentences where you thank them for showing interest in product X. Share some additional details.
And ask them to reply to your email if they have any questions or feedback about the product. This is a great way of getting some great input and engaging with your audience.
Then copy the first question of the survey into a new text box.
Now you have to go back to GetFeedback and on the right side, you’ll see a “Copy Embed Link” button. Click on it and then paste the link into a notepad where you’ll have to build the links for the email.
You’ll see a link like this:
https://www.getfeedback.com/r/ooJNfgzt?gf_q[5532707]=
In the notepad, you’ll want to create 11 different links. Each one will represent a possible answer to your validation question.
Once you’re done the links should look like this:
https://www.getfeedback.com/r/ooJNfgzt?gf_q[5532707]=0
https://www.getfeedback.com/r/ooJNfgzt?gf_q[5532707]=1
https://www.getfeedback.com/r/ooJNfgzt?gf_q[5532707]=2
https://www.getfeedback.com/r/ooJNfgzt?gf_q[5532707]=3
https://www.getfeedback.com/r/ooJNfgzt?gf_q[5532707]=4
https://www.getfeedback.com/r/ooJNfgzt?gf_q[5532707]=5
https://www.getfeedback.com/r/ooJNfgzt?gf_q[5532707]=6
https://www.getfeedback.com/r/ooJNfgzt?gf_q[5532707]=7
https://www.getfeedback.com/r/ooJNfgzt?gf_q[5532707]=8
https://www.getfeedback.com/r/ooJNfgzt?gf_q[5532707]=9
https://www.getfeedback.com/r/ooJNfgzt?gf_q[5532707]=10
Now you just need images for each possible answer: number icons from 0–10.
Go back to your ESP. And under the text box with your question create an HTML block and copy the numbers you’d like from here or use your own.
It’s time to paste your unique links to the corresponding number icon.
And you’re done setting your welcome email up. It should look something like this:
All the data will go to GetFeedback, so go there to check it out and interpret it.
Don’t forget to run a test before you launch your landing page and start sending it out.
If you don’t have an audience you can reach out to, launch a Facebook, Adwords or LinkedIn campaign. Get the word out about your product idea and drive traffic to the landing page
Analyze your Data
Now everything’s in motion. You ran your whole test. It’s time to analyze the data you gathered.
Based on that you’ll have to decide if you’re willing to put resources in making your product a reality.
Happy Validating!
P.S. If you have any questions please leave it comments or ping us.

